The designer is currently still a prototype, but it already has quite a bit to offer.
For example, you can see any changes you make in the SML (Simple Markup Language) immediately in the preview.
If you use buttons to navigate to other pages, this navigation already works in the preview as well.
However, videos are only displayed as thumbnails here.

With our help, you can also become an app designer. You don't need to learn programming or study computer science.
Page {
    backgroundColor: "#0000ßß"
    color: "#ffffFF"
    padding: "8"

    Column {
        padding: "8"

        Markdown {
            color: "#888888"
            text: "Lorem ipsum dolor"
        }
    }
}
SML stands for Simple Markup Language and its similar to QML (Qt Markup Language).
An app is divided into pages. The user can later navigate from page to page,
either by tapping a button or tapping a link.
Or with a so-called pager, which allows you to swipe the pages left or right.
Each page then gets a so-called element to identify what type of file it is. In the case of the page, this is Page. The content of the element is surrounded by the characters { and }.
An attribute like the one above, backgroundColor (background color), is assigned a value in quotes with the “=” sign. In this case, the string “#0000FF” represents the hexadecimal value for a color. Such a color value consists of the character “#” followed by three hexadecimal values for the color components R (red), G (green), and B (blue). The values range from “00” (0) to “FF” (255). If a hexadecimal value is prefixed to the three color values, it denotes the transparency, with “00” being fully transparent and “FF” being fully opaque.
The value “color” here represents the text color, and “padding” refers to the inner spacing. The value padding="8" means that all spacings (top, bottom, left, and right) are set to 8 dp (density-independent pixels). For padding="8 16 20 4", each value corresponds to top, right, bottom, and left, respectively. So, top is 8, right is 16, bottom is 20, and left is 4.
To arrange elements within the page, layouts such as Row and Column are used.
With the Row, the elements are arranged in columns from left to right.
Row {
    Text {
        text: "left column"
    }
    Text {
        text: "right column"
    }
}
With Column, the elements are arranged in rows from top to bottom.
Column {
    Text { text: "upper row" }
    Text { text: "lower row" }
}
Text {
    text: "Lorem ipsum dolor"
}
Normal text can be represented using the Text element.
Markdown {
    text: "
        # Header
        Lorem ipsum
        - List item
        - List item
        "
}
With Markdown, formatted text can be represented.
Buttons are defined using the Button element.
The label attribute specifies what text should be displayed on the button, and link defines what happens when the user clicks the button.
In this case, the about page will be opened.
Button {
    label: "About"
    link: "page:about"
}
The Video element can be used to display a video that is part of the project and has been stored in the assets directory.
The src attribute specifies the video file, in this case, "beach.mp4," and the height attribute defines the height of the video in dp (device pixels).
Video {
    src: "beach.mp4"
    height: "120"
}
These are just a few of the available elements and attributes. A documentation for this will be provided later.
For now, we will focus on implementing the most important features first.
And since this is an open-source project, I hope that a few more developers will join in to complete the rest. ;-)
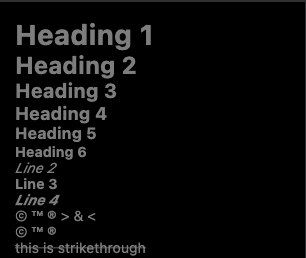
Markdown {
    text: "
        # Heading 1
        ## Heading 2
        ### Heading 3
        #### Heading 4
        ##### Heading 5
        ###### Heading 6
        *Line 2*
        **Line 3**
        ***Line 4***
        (c) (tm) (r) > & <
        (C) (TM) (R)
        ~~this is strikethrough~~
        "
}
With the help of Markdown, a language used by platforms like GitHub, Reddit, Stack Overflow, and Trello to format text,
you can easily and quickly input text.
For example, the # symbol introduces a heading (<H1>).
If you prepend the line with two ## symbols, it creates a subheading (<H2>), and so on, up to <H6>.

Willst Du ein Wort kursiv darstellen, dann stellst du es innerhalb von zwei * Zeichen.
Willst Du ein Wort fett darstellen, dann stellst du es innerhalb von zwei mal * Zeichen.
Fett und kursiv wird dadurch erreicht, dass du eine´oder mehrere Wörter innerhalb von zwei mal ** Zeichen stellst.
Wenn Du den Text durchgestrichen darstellen möchtest, benutzt du zwei ~~ Zeichen vor und zwei Zeichen hinter dem Wort.